Fishhook
Mach-O文件结构 https://www.jianshu.com/p/1f22d1e667e3
MachOView
- (void)viewDidLoad {
    [super viewDidLoad];
    // Do any additional setup after loading the view, typically from a nib.
    //这里必须要先加载一次NSLog,如果不写NSLog,符号表里面根本就不会出现NSLog的地址
    NSLog(@"123");

    //定义rebinding结构体
    struct rebinding nslogBind;
    //函数的名称
    nslogBind.name = "NSLog";
    //新的函数地址
    nslogBind.replacement = myMethod;
    //保存原始函数地址变量的指针
    nslogBind.replaced = (void *)&old_nslog;

    //定义数组
    struct rebinding rebs[] = {nslogBind};

    /**
     arg1: 存放rebinding结构体的数组
     arg2: 数组的长度
     */
    rebind_symbols(rebs, 1);
}

//函数指针,用来保存原始的函数地址
static void (*old_nslog)(NSString *format, ...);

//新的NSLog
void myMethod(NSString *format, ...) {
    //再调用原来的
    old_nslog(@"勾上了!");
}

- (void)touchesBegan:(NSSet<UITouch *> *)touches withEvent:(UIEvent *)event {
    NSLog(@"点击屏幕");
}
lldb
- iOS之LLDB常用命令 https://www.jianshu.com/p/7fb43e0b956a

iOS存储
存储方式
- NSUserDefault,可以存放Key-Value对形式的轻量数据。
- NSKeyedArchiver,存储对象到二进制文件。
- writeToFile,将NSString、NSArray、NSDictionary、NSData对象存储到文件。
- CoreData.Framework,对象管理并支持对象持久。

- Sqlite,轻量数据库
- Keychain,钥匙串存储
- NSUbiquitousKeyValueStore,存储数据到iCloud
关于安全性
- 敏感数据不要明文存储
- 存放在Keychain,不越狱还是安全的
- Safety is relative, choose a safer way.
三方库
- AwesomeCache
- YYCache 基于Disk、Memory的缓存
- YTKKeyValueStore 基于Sqlite的健值对数据的存储
- SwiftyUserDefaults
- FMDB
- ObjectiveRecord CoreData的封装
- realm Realm is a mobile database: a replacement for Core Data & SQLite.
- Valet 基于Keychain的数据存储,接口简洁易用,支持同一开发者下应用间数据共享,支持iCloud数据同步,通过TouchID或设备密码保护数据。
- UICKeyChainStore
- KeychainAccess
- Keychain-Dumper Keychain is not safe.
参考
iOS测试框架XCTest
- XCTest已基本满足单元测试和UI测试的需求,支持对同步流程、异步流程、性能的测试,UI测试代码的自动生成,代码测试覆盖率的统计等。
- UI测试也还有不足的地方,例如录制生成的代码仍不够完善,无法直接访问目标APP的接口,无法修改边界条件,在单设备或单模拟器运行效率过低,每次重启目标App后只能运行一个Case。
- 一些三方库
- Bluepill is a tool to run iOS tests in parallel using multiple simulators.
- XCTest官方手册
- iOS单元测试和UI测试
- 单元测试之旅--预见优秀
- iOS UnitTest单元测试
- Android单元测试的整理
Alamofire源码分析
概述
Alamofire跟AFNetworking的功能差不多,都是对URLSession的封装,对上层提供易用的网络请求接口。Alamofire和AFNetworking分别是Swift和OC的实现版本。目前,这两个网络封装库的关注度和使用率非常高,代码质量也相当不错。本文想通过对
Alamofire源码的简单分析,了解其基本框架和设计思路。源码链接:Alamofire
一个GET请求的源码分析
- 从最简单的Get请求入手,分析
Alamofire的代码。一个请求流程,可以分为请求发送流程和请求响应流程,下文将从这两个流程展开分析。
// Get请求的调用方式
Alamofire.request("https://httpbin.org/get").responseJSON { response in
    print(response.request)  // original URL request
    print(response.response) // HTTP URL response
    print(response.data)     // server data
    print(response.result)   // result of response serialization

    if let JSON = response.result.value {
        print("JSON: \(JSON)")
    }
}
请求发送流程
Alamofire.Swift可以认为Alamofire一些对外接口的包装(Facade API)。Alamofire.request实际上是调用了SessionManager.request。
// 调用request方法
/// Creates a `DataRequest` using the default `SessionManager` to retrieve the contents of a URL based on the specified `urlRequest`.
@discardableResult
public func request(_ urlRequest: URLRequestConvertible) -> DataRequest {
    return SessionManager.default.request(urlRequest)
}
- 在
SessionManager.request,Request被组装创建,并加到发送队列中,然后等待一系列的响应事件。而SessionManager主要职责是管理发送队列,组装请求消息,设置Session相关的配置,设置工作线程等。
// 创建request对象,并开始发送
/// Creates a `DataRequest` to retrieve the contents of a URL based on the specified `urlRequest`.
    open func request(_ urlRequest: URLRequestConvertible) -> DataRequest {
        var originalRequest: URLRequest?

        do {
            originalRequest = try urlRequest.asURLRequest()
            let originalTask = DataRequest.Requestable(urlRequest: originalRequest!)

            let task = try originalTask.task(session: session, adapter: adapter, queue: queue)
            let request = DataRequest(session: session, requestTask: .data(originalTask, task))

            delegate[task] = request

            if startRequestsImmediately { request.resume() }

            return request
        } catch {
            return request(originalRequest, failedWith: error)
        }
    }
- 接着,通过
Request.responseJSON设置JSON响应回调的处理方法。
// 设置回调
/// Adds a handler to be called once the request has finished.
    @discardableResult
    public func responseJSON(
        queue: DispatchQueue? = nil,
        options: JSONSerialization.ReadingOptions = .allowFragments,
        completionHandler: @escaping (DataResponse<Any>) -> Void)
        -> Self
    {
        return response(
            queue: queue,
            responseSerializer: DataRequest.jsonResponseSerializer(options: options),
            completionHandler: completionHandler
        )
    }
Request.responseJSON实际上是调用Request.response,将回调添加到Request.delegate.queue,然后等待响应事件。
    /// Adds a handler to be called once the request has finished.
    @discardableResult
    public func response<T: DataResponseSerializerProtocol>(
        queue: DispatchQueue? = nil,
        responseSerializer: T,
        completionHandler: @escaping (DataResponse<T.SerializedObject>) -> Void)
        -> Self
    {
        delegate.queue.addOperation {
            let result = responseSerializer.serializeResponse(
                self.request,
                self.response,
                self.delegate.data,
                self.delegate.error
            )

            var dataResponse = DataResponse<T.SerializedObject>(
                request: self.request,
                response: self.response,
                data: self.delegate.data,
                result: result,
                timeline: self.timeline
            )

            dataResponse.add(self.delegate.metrics)

            (queue ?? DispatchQueue.main).async { completionHandler(dataResponse) }
        }

        return self
    }
- 至此,发送流程完成,接着就等待响应事件。
请求响应流程
一个请求的响应事件会有多个,并按循序上报,例如以下几个主要事件,
HTTPS鉴权事件
func urlSession(_ session: URLSession,task: URLSessionTask, didReceive challenge: URLAuthenticationChallenge, completionHandler: @escaping (URLSession.AuthChallengeDisposition, URLCredential?) -> Void)收到Response响应头事件
func urlSession(_ session: URLSession,dataTask: URLSessionDataTask, didReceive response: URLResponse, completionHandler: @escaping (URLSession.ResponseDisposition) -> Void)收到Response Body数据事件
func urlSession(_ session: URLSession, dataTask: URLSessionDataTask, didReceive data: Data)响应流程完成事件
func urlSession(_ session: URLSession, task: URLSessionTask, didCompleteWithError error: Error?)本文以最后一个响应流程完成事件为例,梳理下整个响应流程。
首先,
SessionDelegate会收到由URLSession.delegate上报的urlSession:task:didCompleteWithError,根据task找到URLSessionTask并通过其delegate上报事件给TaskDelegate。
    /// Tells the delegate that the task finished transferring data.
    open func urlSession(_ session: URLSession, task: URLSessionTask, didCompleteWithError error: Error?) {
        /// Executed after it is determined that the request is not going to be retried
        let completeTask: (URLSession, URLSessionTask, Error?) -> Void = { [weak self] session, task, error in
            guard let strongSelf = self else { return }

            if let taskDidComplete = strongSelf.taskDidComplete {
                taskDidComplete(session, task, error)
            } else if let delegate = strongSelf[task]?.delegate {
                delegate.urlSession(session, task: task, didCompleteWithError: error)
            }

            NotificationCenter.default.post(
                name: Notification.Name.Task.DidComplete,
                object: strongSelf,
                userInfo: [Notification.Key.Task: task]
            )

            strongSelf[task] = nil
        }

        guard let request = self[task], let sessionManager = sessionManager else {
            completeTask(session, task, error)
            return
        }

        // Run all validations on the request before checking if an error occurred
        request.validations.forEach { $0() }

        // Determine whether an error has occurred
        var error: Error? = error

        if let taskDelegate = self[task]?.delegate, taskDelegate.error != nil {
            error = taskDelegate.error
        }

        /// If an error occurred and the retrier is set, asynchronously ask the retrier if the request
        /// should be retried. Otherwise, complete the task by notifying the task delegate.
        if let retrier = retrier, let error = error {
            retrier.should(sessionManager, retry: request, with: error) { [weak self] shouldRetry, timeDelay in
                guard shouldRetry else { completeTask(session, task, error) ; return }

                DispatchQueue.utility.after(timeDelay) { [weak self] in
                    guard let strongSelf = self else { return }

                    let retrySucceeded = strongSelf.sessionManager?.retry(request) ?? false

                    if retrySucceeded, let task = request.task {
                        strongSelf[task] = request
                        return
                    } else {
                        completeTask(session, task, error)
                    }
                }
            }
        } else {
            completeTask(session, task, error)
        }
    }
- 接着,
TaskDelegate收到该事件后,恢复queue队列,按循序执行其中的回调,如ResponseJSON。
    @objc(URLSession:task:didCompleteWithError:)
    func urlSession(_ session: URLSession, task: URLSessionTask, didCompleteWithError error: Error?) {
        if let taskDidCompleteWithError = taskDidCompleteWithError {
            taskDidCompleteWithError(session, task, error)
        } else {
            if let error = error {
                if self.error == nil { self.error = error }

                if
                    let downloadDelegate = self as? DownloadTaskDelegate,
                    let resumeData = (error as NSError).userInfo[NSURLSessionDownloadTaskResumeData] as? Data
                {
                    downloadDelegate.resumeData = resumeData
                }
            }

            // queue队列中的operaion开始按循序执行,回调到上层。
            queue.isSuspended = false
        }
    }
其他模块
除了发送,响应相关的代码,
Alamofire还有许多其他模块。例如,NetworkReachabilityManager管理网络状态。ParameterEncoding入参编解码方式。ResponseSerialization响应的反序列化方式。ServerTrustPolicyHTTPS的鉴权等等。
总结
- 分析得比较简单,抱砖引玉。
iOS学习导图
本文简单罗列了下iOS相关的点。
基础
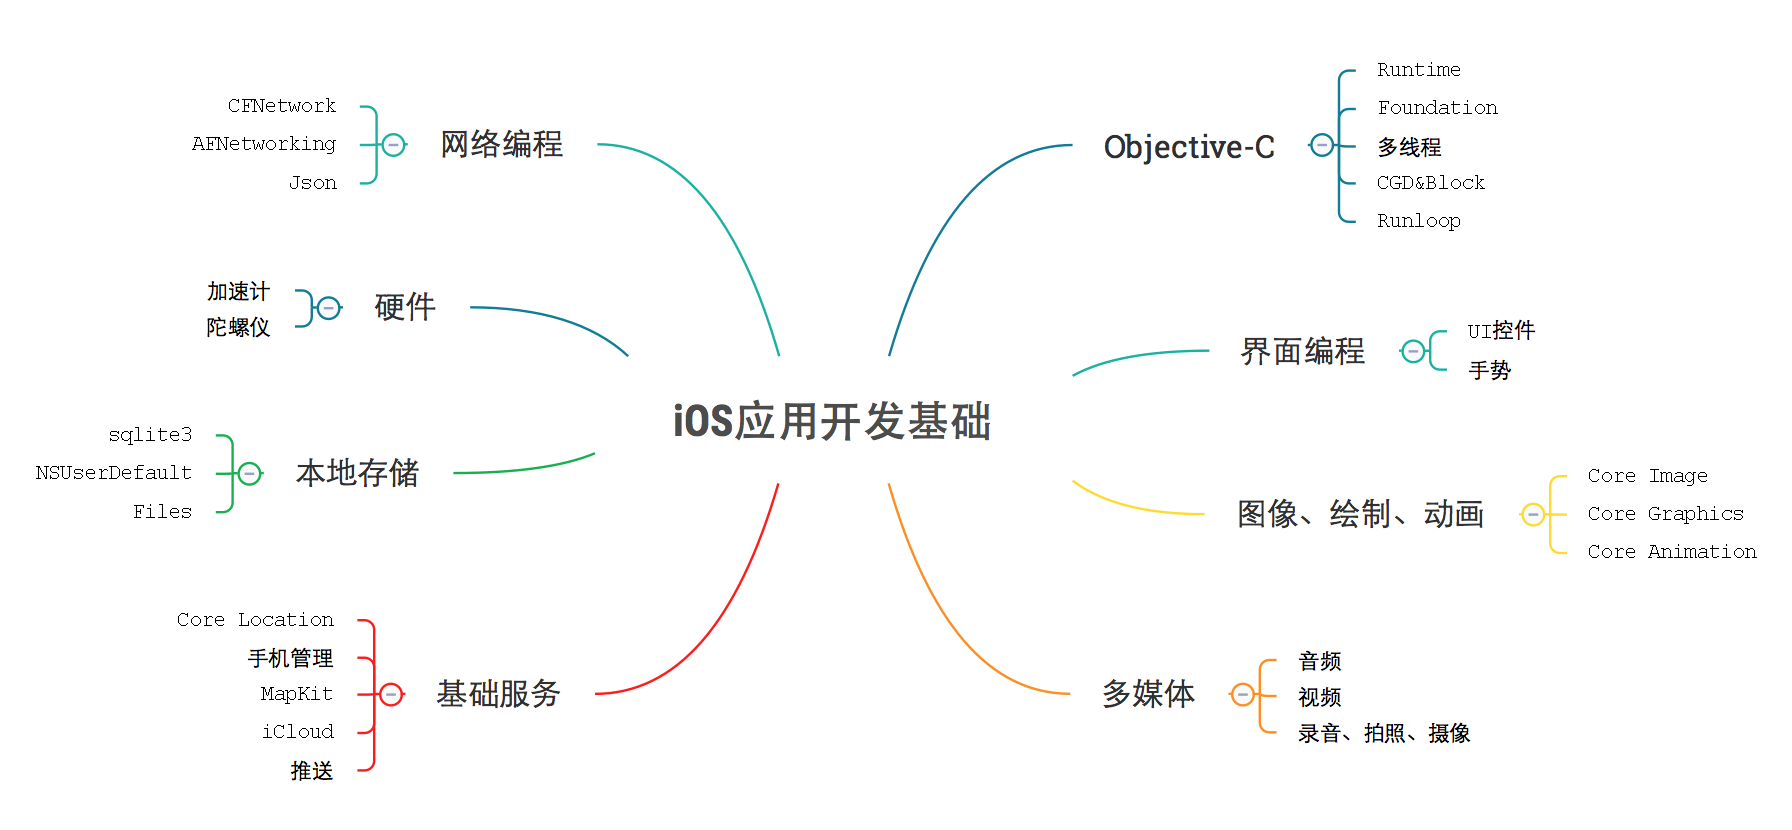
- Runloop
- 多线程&同步
- Core Animation
Core Animation编程指南
iOS-Core-Animation-Advanced-Techniques
- Block
- GCD
- Core Foundation
应用优化
OC Runtime(1)之Object&Class
Objective-C Runtime
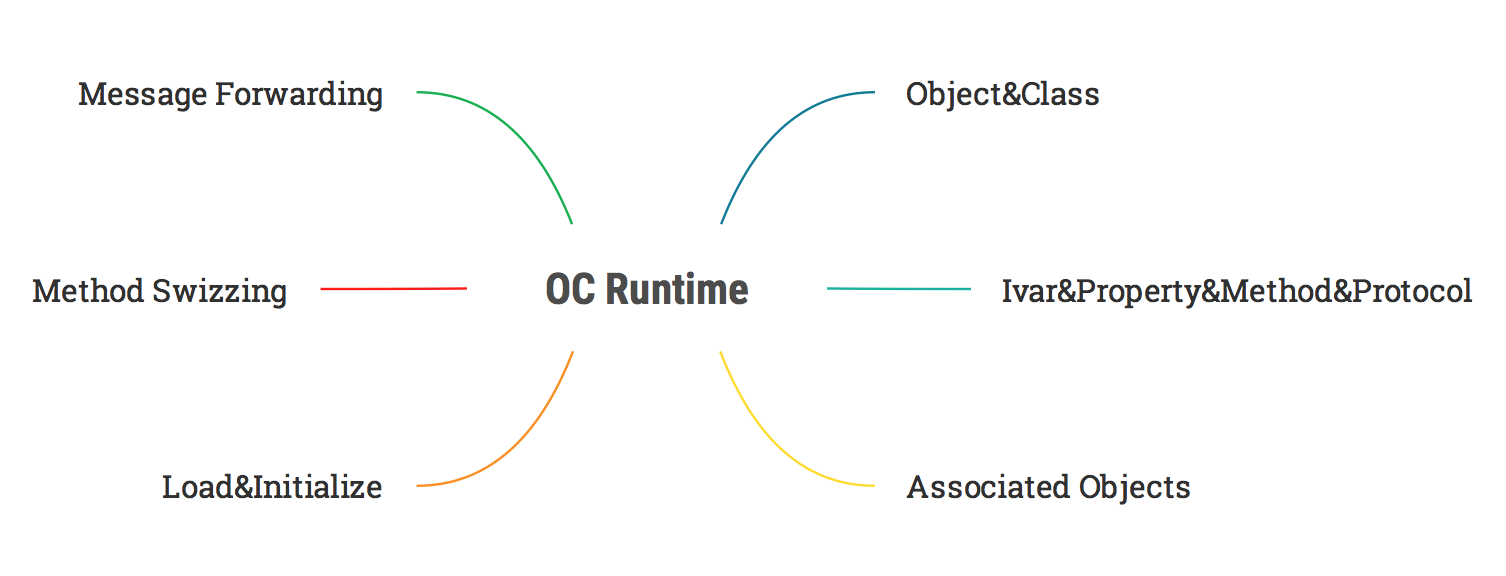
Objective-C是面向运行时的编程语言,这就意味着运行阶段才知道如何执行,而不是编译链接阶段就确定好。
What is the Objective-C Runtime?
The Objective-C Runtime is a Runtime Library, it's a library written
mainly in C & Assembler that adds the Object Oriented capabilities
to C to create Objective-C. This means it loads in Class information,
does all method dispatching, method forwarding, etc. The Objective-C
runtime essentially creates all the support structures that make
Object Oriented Programming with Objective-C Possible.
- 有了Objective-C Runtime,就有了各种在运行时修改代码的hack手段。
类
- 先看下
类的结构体定义,除了存放类的基本信息,还存放对象的变量、方法、协议的元信息。程序加载时,类结构体会被实例化,并放到全局列表中g_classList,结构体的isa、super_class、methodLists等属性也一起被初始化。
// 伪代码,对源码稍做修改。

static Class *g_classList;

struct objc_class {
    Class isa;          // 指向元类
    Class super_class;  // 指向父类

    // 类基本信息
    const char *name;
    long version;
    long info;
    long instance_size;

    // 类的变量、方法、协议的元信息
    struct objc_ivar_list *ivars;
    struct objc_method_list **methodLists;
    struct objc_protocol_list *protocols;

    // 方法缓存
    struct objc_cache *cache;
};
typedef struct objc_class *Class;

bool isMetaClass() {
        return info & CLS_META;
    }
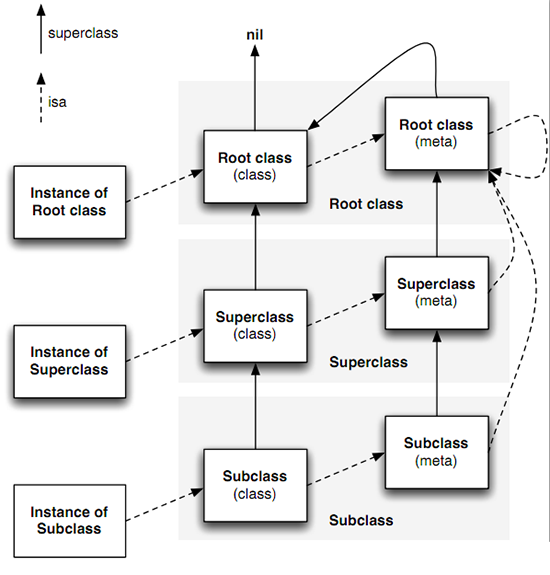
元类
元类跟类使用相同的结构体,只是通过isMetaClass方法做区分。元类结构体中,存放类的变量、方法、协议的元信息。对象、类、元类的关系如下:
对象
- 对象的结构体如下,存放对象的变量数据,其他的都是先通过
isa找到类,再从类中找出变量、方法等的元信息。
// 伪代码,对源码稍做修改。

struct objc_object {
    Class isa;

    // 变量的数据
    void *varsLayout;
}

typedef struct objc_object *id
- 创建对象,
NSObject *obj = [[NSObject alloc] init];可能对应以下一些动作。
// 伪代码

{
    // 找到类
    Class cls = findClass("NSObject");

    // 找到alloc方法,执行生成对象
    IMP imp = findImp(cls, "alloc");
    id obj = imp(cls);

    // 找到init方法,执行初始化对象
    IMP imp = findImp(cls, "init");
    imp(obj);

    // 返回对象
    return obj;
}

id alloc(Class cls) {
    id obj = malloc(sizeof(struct objc_object));
    obj->isa = cls;
    return obj;
}

id init(id obj) {
    obj->varsLayout = xxx;
}
总结
- 总的来说,全局维护一张类表,存放类方法、实例方法、实例变量的元信息等。程序加载阶段会初始化这张表。运行阶段,也可以通过
addMethod、class_replaceMethod、class_addIvar、class_addProtocol、class_addProperty等接口动态修改这张表。
### 参考 - ObjCRuntimeGuide
- runtime源码
- Objective-C 的动态提示和技巧
- NSObject的load和initialize方法
- associated-objects
Copyright © 2015 Powered by MWeb, Theme used GitHub CSS.